Flare-On 2018 - Challenge 12 - cat'n'grep
New year, new Flare-On. This year edition somehow pushed us to the world of VMs reversing. First with challenge 10 built on top of the Intel VMX instruction set, later with challenge 12. The last challenge was quite crazy as usual, but it kind of intrigued me a lot. That's why I'm going to cover it here. If you are interested only in the second part of the challenge, jump there. I publish two posts: one explaining how I got the flag no matter what, the second showing a cleaner approach and some in-depth details of the VMs.
We are given a floppy disk image and the following challenge description.
Suspicious Floppy Disk - Now for the final test of your focus and dedication. We found a floppy disk that was given to spies to transmit secret messages. The spies were also given the password, we don't have that information, but see if you can figure out the message anyway. You are saving lives.
If we unpack the floppy image we can see a bunch of files, including AUTOEXEC.BAT—the famous startup file used by MS-DOS and early versions of Windows. The autoexec is one line only: infohelp.exe. No doubts, infohelp.exe is automatically executed when we insert the floppy in our machine. We also get three suspicious files inside the same image: message.dat, key.dat and TMP.DAT. Remember about these.
I used DOSBox to mount the unpacked floppy and play a bit with that infohelp. Its output is the following:
Z:\> infohelp.exe
Enter the password to receive the message: testtesttest
Message: This is not the message you are looking for.

Z:\>
The message output seems to be the content of message.dat. The message changes If we modify the dat file. On the other hand key.dat is empty. Maybe the program uses a combination of its content plus the password we type. IDA Pro could be helpful to understand what's going on.
After quickly jumping around functions and cross-references, I couldn't find a sweet spot to start the real reversing. Everything was in order, at least from an high-level point of view.
Suddenly a bell started ringing in my mind. Look at the file output on the floppy:
$ file suspicious_floppy_v1.0.img
suspicious_floppy_v1.0.img: DOS/MBR boot sector, code offset 0x3c+2, OEM-ID "*-v4VIHC"
cached by Windows 9M, root entries 224, sectors 2880 (volumes <=32 MB), sectors/FAT 9,
sectors/track 18, serial number 0x2a876ce1, label: "           ", FAT (12 bit), followed by FAT
Considering the DOS/MBR boot sector string, files in the image with SYS extension and the autoexec batch file, what if someone has been tampering with the boot sector? We can try to load the floppy disk as it is—without extracting its content—either with QEMU or DOSBox again.
Theory confirmed. Run QEMU with qemu-system-i386 -fda suspicious_floppy_v1.0.img and you get a quite explicit output.
A:\> infohelp.exe
Enter the password to receive the message: testtesttest
Welcome to FLARE spy messenger by Nick Harbour.
Your preferred covert communication tool since 1776.
Please wait while I check that password...
Incorrect Password.
You fail it. Please try harder.
Message: This is not the message you are looking for.

A:\>
Good, we just found a starting point! The floppy is most likely shipped with a bootkit hooking into infohelp. Let's confirm this with IDA and always consider we are working on 16 bits real-mode. A debugger could also be helpful. Launch QEMU in this way:
qemu-system-i386 -fda suspicious_floppy_v1.0.img -S -s
Attach to it with gdb using the following gdb commands:
target remote localhost:1234
set architecture i8086
gdb doesn't support 16 bits real-mode addressing, but you can find here a very nice .gdbinit to partially overcome this limitation.
When the machine boots up, the BIOS will copy the first sector of the floppy at
address 0000:7c00 and the first instruction ever will be jmp 0x7c3e. This
jump is needed to skip the BIOS Parameter Block1, a data structure
describing the physical layout of the diskette. We land on the new address and
we can see that the first 0x200 bytes of the first disk sector—because it's mapped at 0x7c00—are copied to 0x600. Next jump
will be at address 0x662 which translates to offset 0x62 of the raw image.

At this point we reach an int 13h, a vector for accessing disks read/write services2. The boot code asks the BIOS to load 0x30 sectors starting from head 0, track 34 and sector 1, to address 0x800 and then jump on it with a call bx instruction.

That weird TMP.DAT file we found in the disk lies exactly on head 0, track 34,
sector 1 and it's the bootkit payload. Indeed, its stage 1 code looks quite suspicious.

The first thing to notice is the access to 0040:0013 (mov bx, ds:413h). This
memory zone belongs to the BIOS Data Area3 and the memory at that particular address holds the base memory size in KB of the system. Seen in the other way around, the bootkit takes the last possible base memory address and decrements it by 32KB. It then takes the segment of this address (shl bx, 6) and uses it to copy itself in the new region obtained with the 32KB subtraction.
The real fun begins now. As shown in the second part of the image above, the bootkit
is overwriting the interrupt vector table at addresses 0000:004c and
0000:0004e, respectively the offset and segment of vector 13h. Every disk
operation will be intercepted from now on.
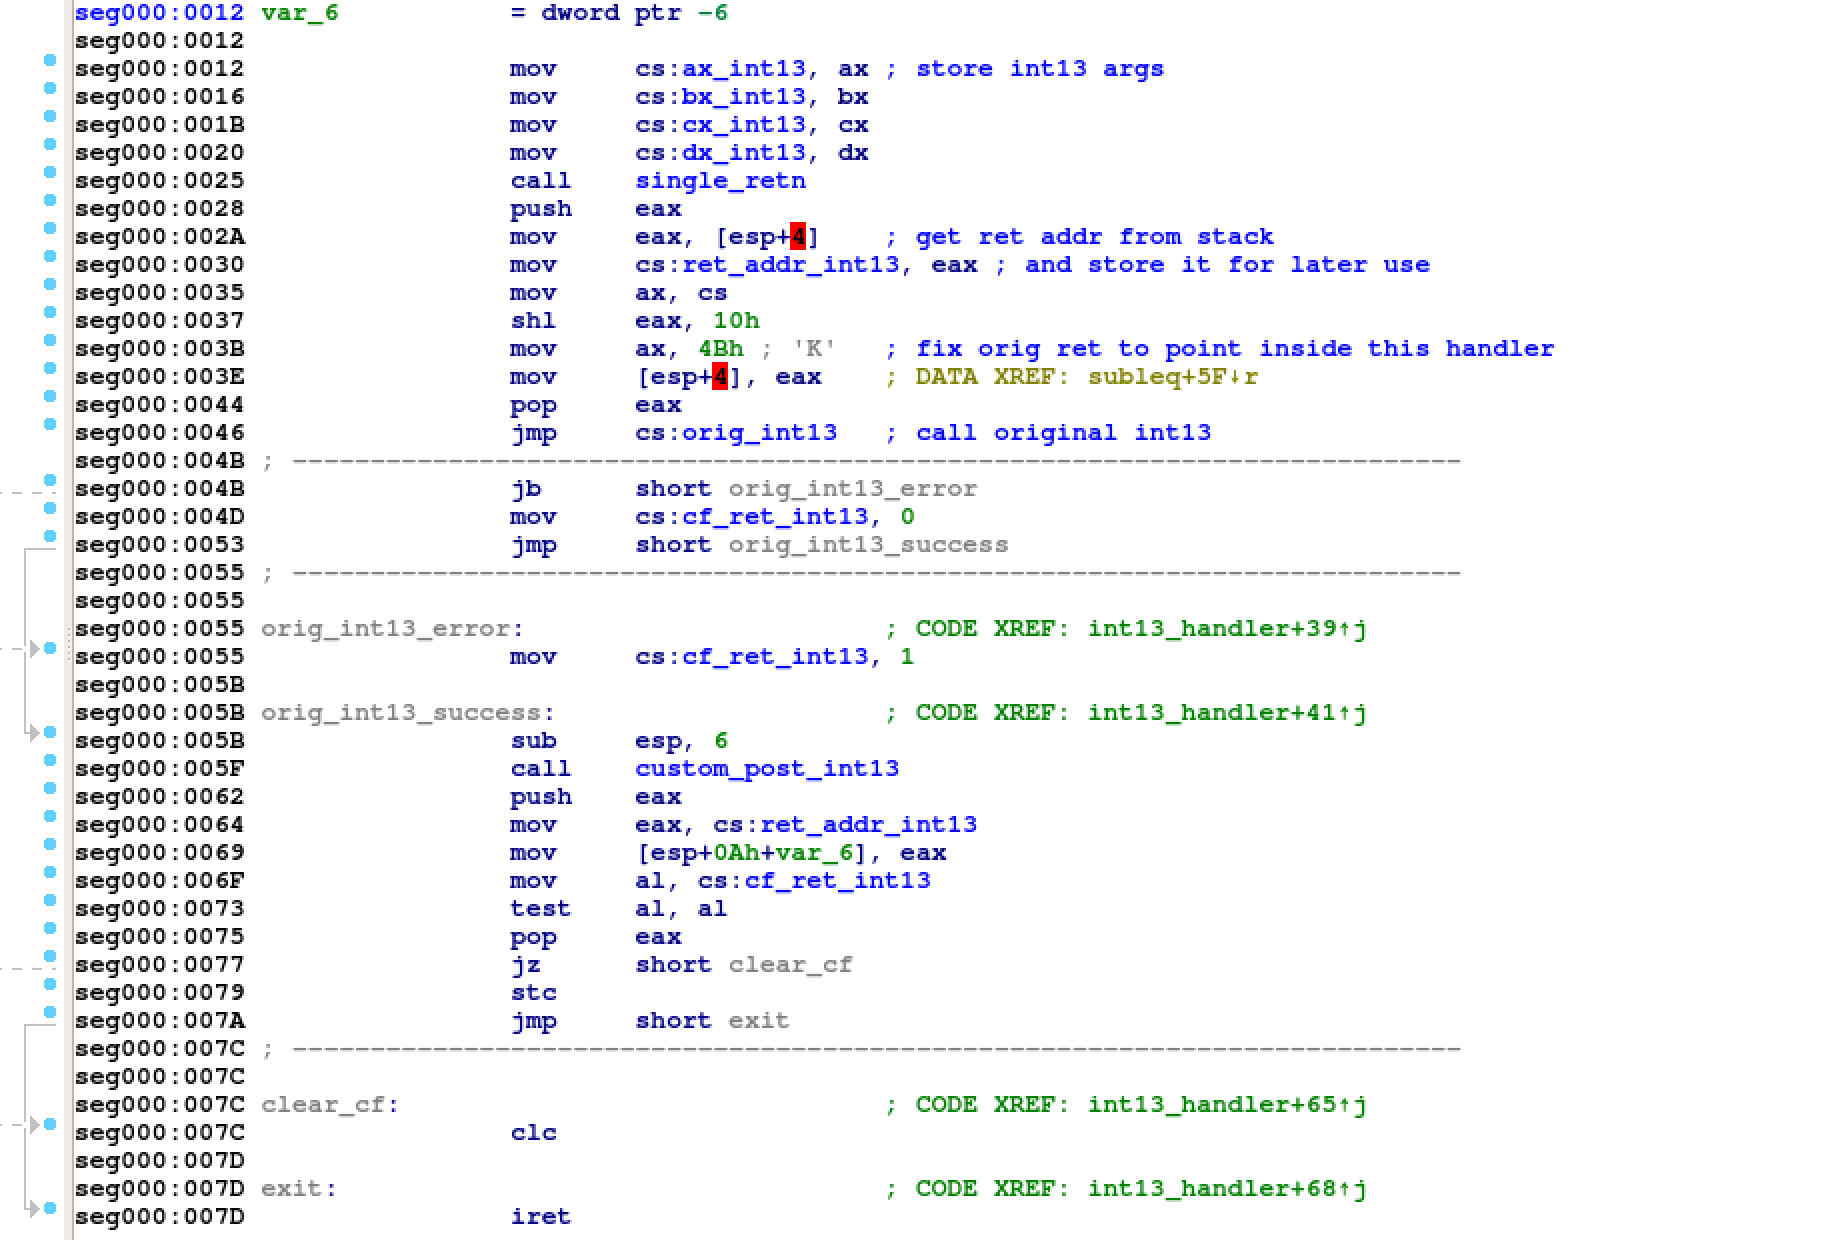
The initial bootstrap code—coming after the call bx at 0000:0662—fires a second interrupt
13h, this time with the vector hook in place. The following picture shows the
code of the new custom interrupt handler.

You can see how this malicious code first calls the original interrupt handler and eventually executes its own custom post-interrupt handler.
Like every time I start reversing, before dealing with assembly I prefer to explore the routines identified by IDA in graph view. Personally I find this approach to work pretty good and allows me to save time quite often. It's matter of mental order and of understanding how blocks of code relate each other. If I'm lucky enough—I was in this case—I can avoid reversing code that is useless for the final result.

One drawback is that I'll miss the 360° picture of the binary. Absolutely
not a problem for CTFs.
For example, look at the graph on the right. It's full of conditional branches
all getting into the same basic block. Zoom-in and you will see different
behaviors depending on the arguments passed to int 13h. I temporarily discard all the code
left behind and I continue reversing starting from here, at offset 0xc2 of
TMP.DAT.
Moreover, this function is calling 4 other functions, three of them being very
small in size and one more complex. We start hopping again from one function to
another until we get into a piece of code in which we can clearly identify a loop.
It's at offset 0x5e1c and looks like a Subleq4 interpreter.
This Subleq machine takes three arguments:
5- an integer used as initial instruction pointer of the Subleq;0x2dad- the length of the Subleq code array;0x266- the pointer to the Subleq code array.

It's almost time to reimplement the Subleq in python, but first we need to
understand how our input password is flowing in. Actually, one of the three
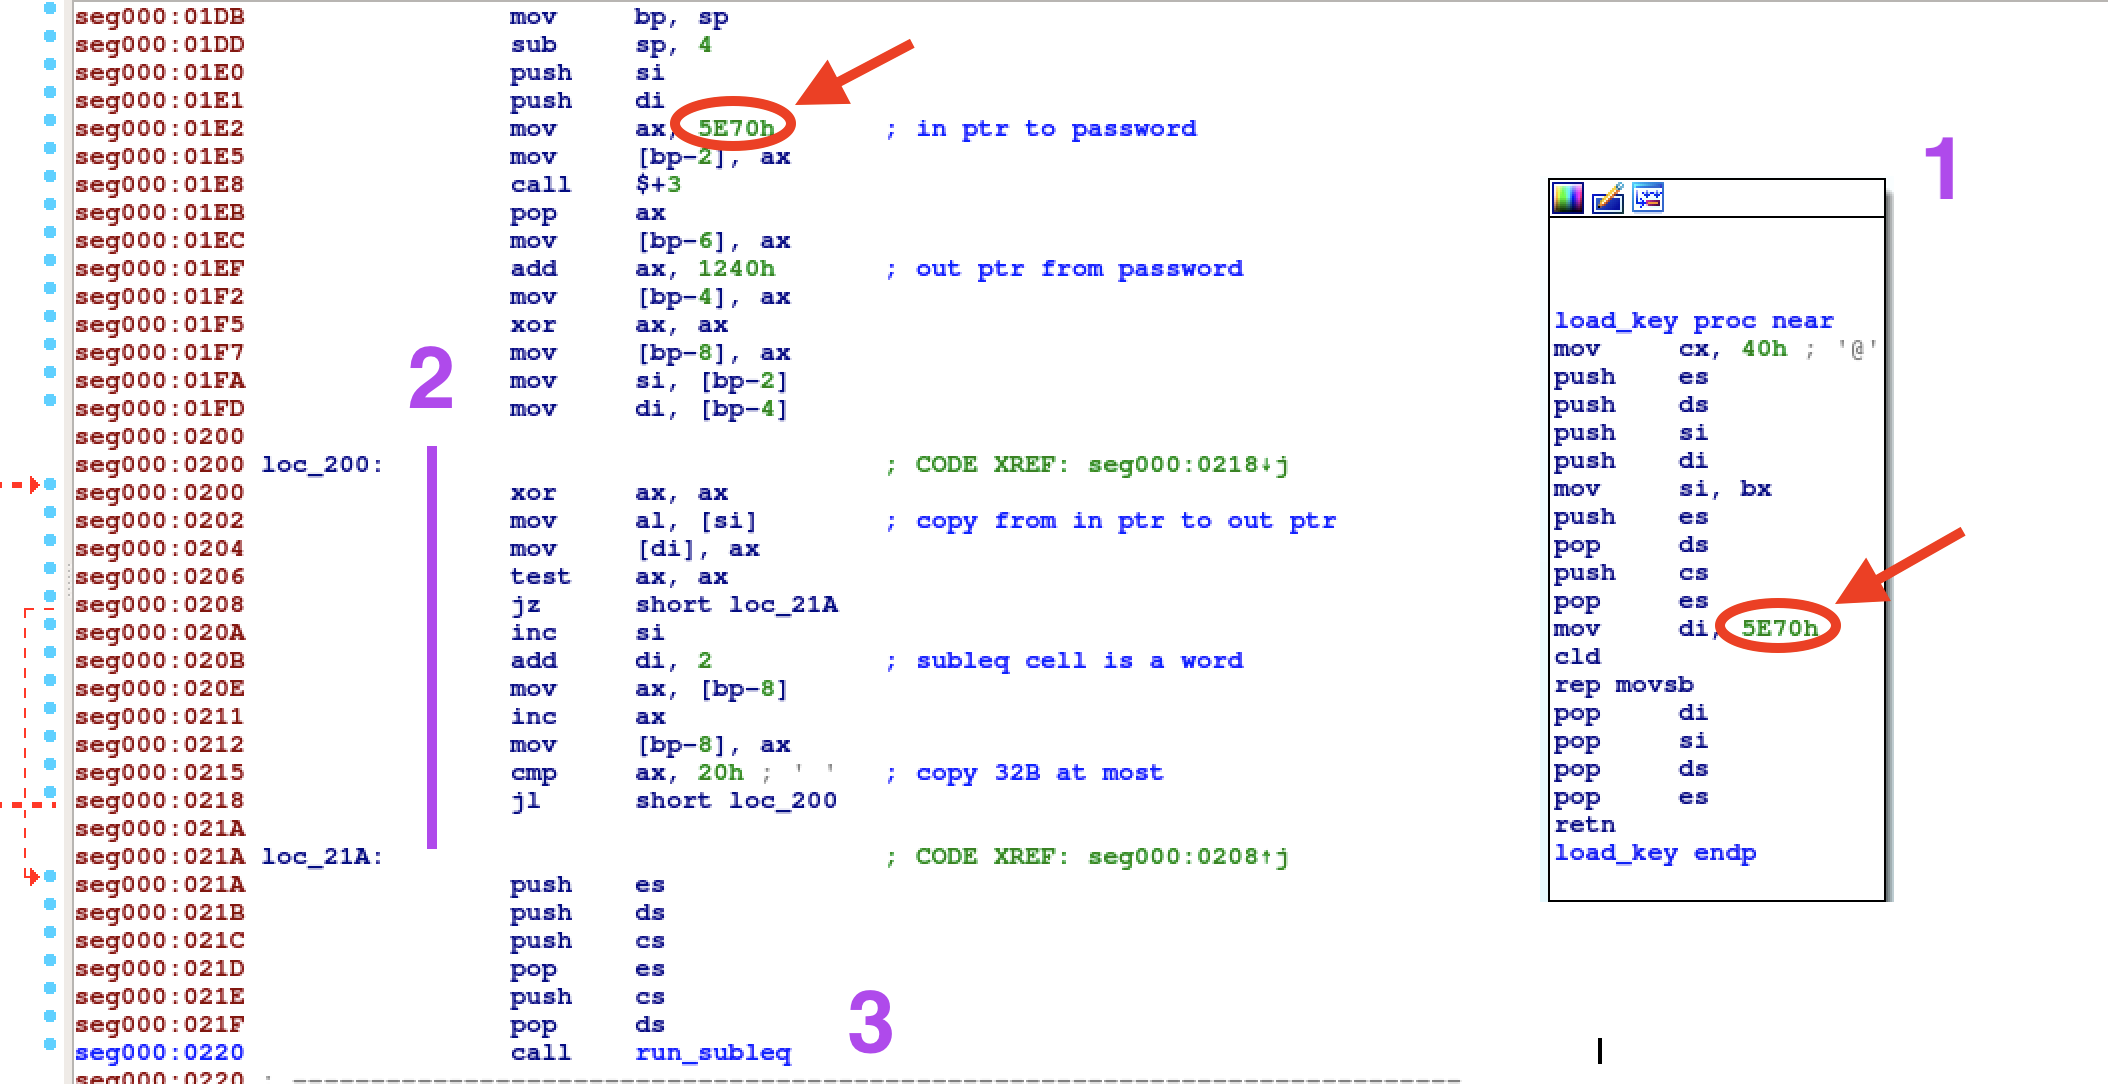
small routines called by our post-interrupt handler is a good candidate. Is the
one named load_key in the picture above. It's executed as soon as there is a
write request on head 1, track 33, sector 16. Basically after infohelp writes
our password inside key.dat. The password is first copied to 5e70 and then
stored at offset 0x1208 of the Subleq code. Notice that only 32B are copied,
thus the maximum password length is 32B.
Alright, we can throw away the floppy image and run the Subleq with some python code.
cat'n'grep
We have to reverse the Subleq maybe. Challenge 11 of
Flare-On 2017 was based on a Subleq as well. However, that one was affected by
an important side-channel. I bruteforced it by counting the amount of executed instructions
without even reversing its code. The Subleq we have in this edition seems to be
more resistant. As the section title says, I solved it by using the Subleq execution trace and
cat / grep commands. Maybe not the intended solution but still, it worked at the end.
The Subleq code is way too verbose. A full execution trace may eat up to some GB of
storage. We are not even interested in every single operation, just how our password is handled.
I decided to implement basic tainting functionalities in my Subleq engine. I
mark the initial password cells as tainted, then I print all the operations
using those tainted cells. If pieces of the password are moved from one cell to
another, then I untaint the source cell and taint the destination cell.
Let's start with a random password and see if we can spot some
patterns.

The first pattern we can recognize is the sum of all the input bytes. In the
example above the password starts with te and the sum of these two bytes is 217. If the password is A*32, the sum is 2080 of course.

Every input char is also subtracted by 32—see above.
After hours of grepping I reached a dead end. No more useful patterns. Flare-On
flags normally ends with @flare-on.com. It could be the Subleq needs this
part. We type “test@flare-on.com” and the Subleq suddenly slows down a
lot. It means that we executed a new—important—code path. Trial and error on
our input and we can understand that @ is a special character. The at triggers new Subleq instructions.

With @, the sum of the password bytes is increased by a big number,
0x5800 in our example with password testTESTAAABBB@. Actually, I explain what is that number in my second solution for this challenge.
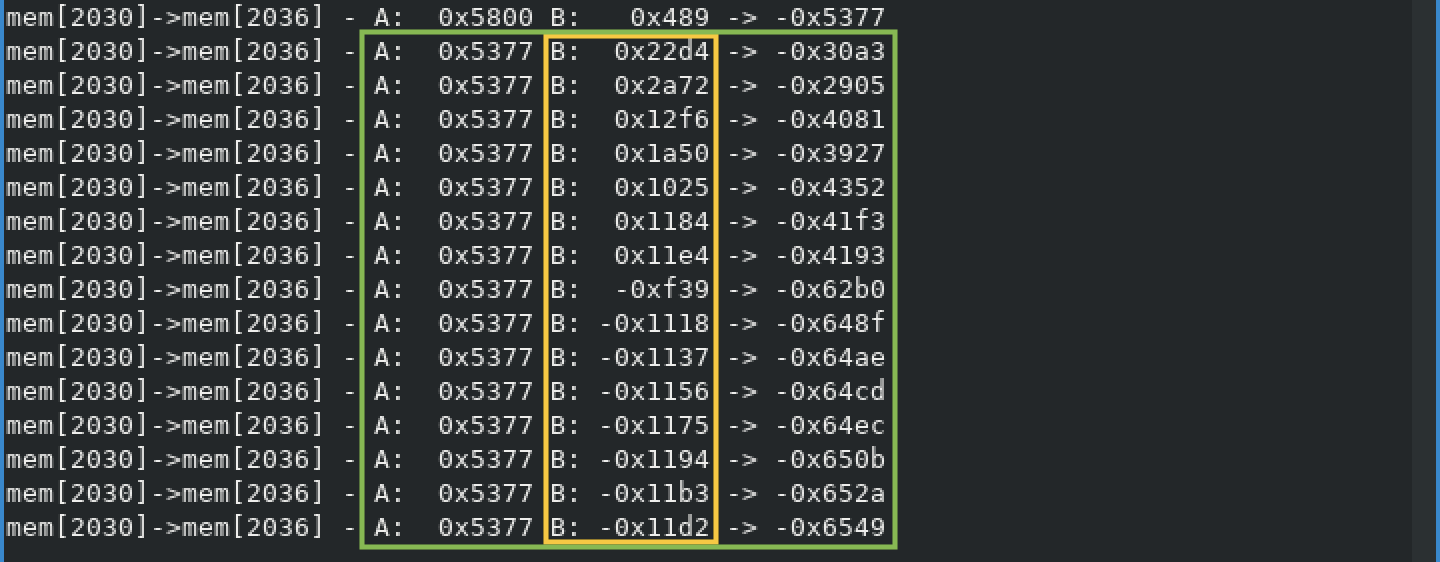
We go ahead and grep for this final sum of 0x5377.

We finally get something really interesting. The grep output doesn't have any noise this time, in addition 0x5377 is added to 15 different values.
Let's grep for the first value 0x22d4 and we can observe a new key point. See
below.

So it looks like 2 bytes of the password are moved onto 1 word. However, as
we've seen before, each char is subtracted by 32 and the upper byte is shifted
by 7 bits. We use ASCII characters. Their size is maximum 7 bits.
We use the same algorithm for the second couple of bytes and the result will be
0x2a53. In the picture with the 15 values we have 0x2a72 instead. For the
third couple it should be 0x12b4, not 0x12f6.
We don't know a lot about all the other values, yet they help us to guess the
final password length. 15 words corresponds to a 30 character password. Our new
random password becomes testTESTAAABBBCCC@flare-on.com and its first stage sum we
use for grepping is 0x2eae.
At this point the first thing which came up in my mind was to xor my values with the values of the subleq.
0x22d4 ^ 0x22d4 = 0     # 0000 0000 0000 0000    te
0x2a53 ^ 0x2a72 = 0x21  # 0000 0000 0010 0001    st
0x12b4 ^ 0x12f6 = 0x42  # 0000 0000 0100 0010    TE
0x1a33 ^ 0x1a50 = 0x63  # 0000 0000 0110 0011    ST
....
0x218e ^ 0x2023 = 0x1ad # 0000 0001 1010 1101    .c
0x26cf ^ 0x2701 = 0x1ce # 0000 0001 1100 1110    om
There is a pattern here as well and the bits visualization of the xor results makes things much clearer. The program is using an incremental mask in this way:
for i in range(15):
   mask = (i << 5) | i
   val = word[i] ^ mask
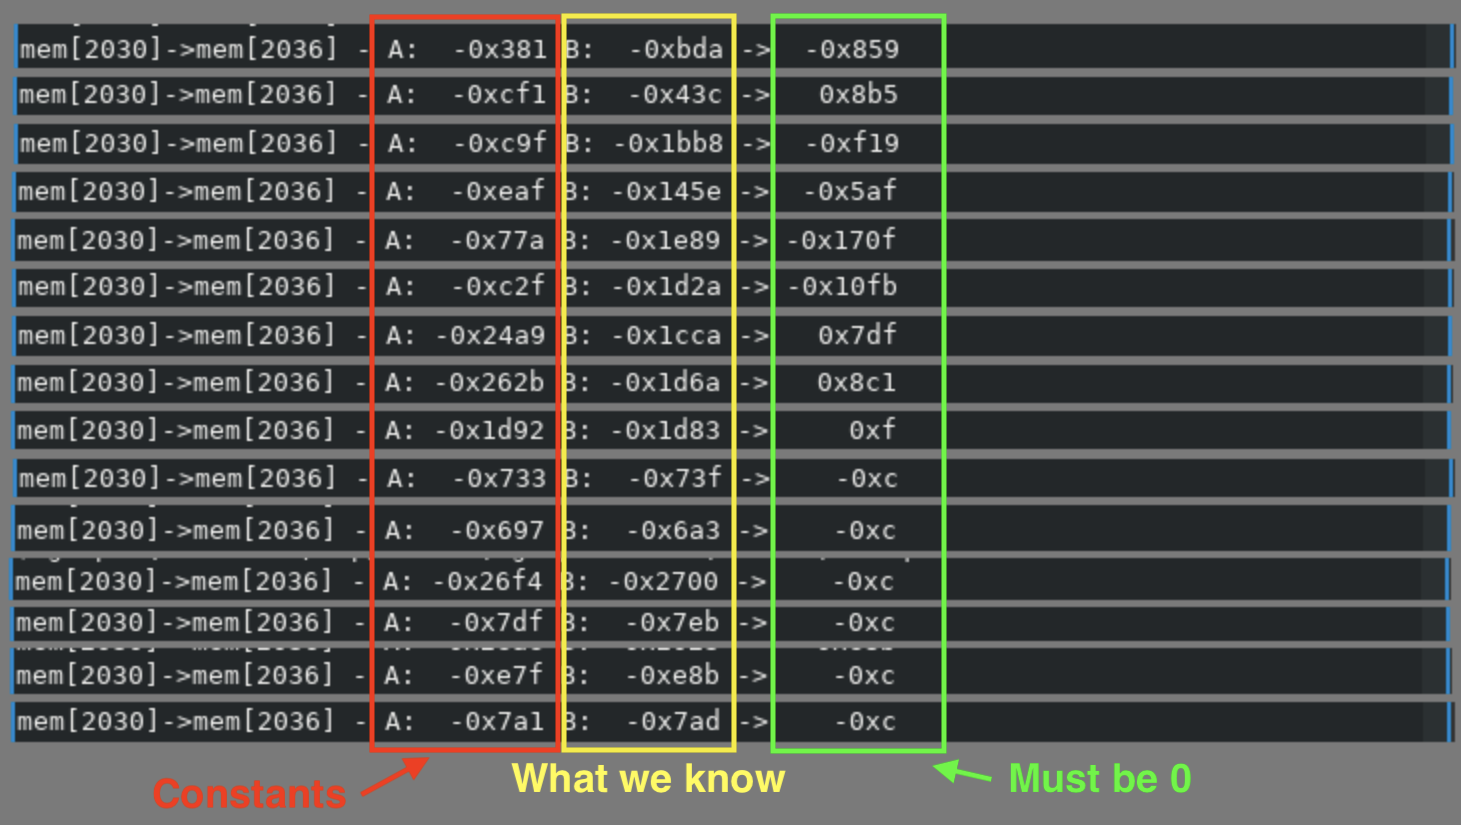
If we find the values for the final comparison we get the flag. We grep for
each result of 0x2eae plus the xored value and we get the following.

To recap: we know all the bytes up to @ are accumulated and summed with a big
number, pair of bytes are xored with an incremental bitmask and added to the previous
sum, the final results must equal the constants we found.
Since the last part of the flag is standard and should be correct, we can reverse the sum and see it must be 11938.
Some python code and finally the flag appears: Av0cad0_Love_2018@flare-on.com.
You can find my flag-script here.